Proudly Canadian

Proudly Canadian

Sunday, February 23, 2014

Happy Scrapper...

This tag depicts me.  My joy, my time for solitude and reflection, my space away from everything else. 

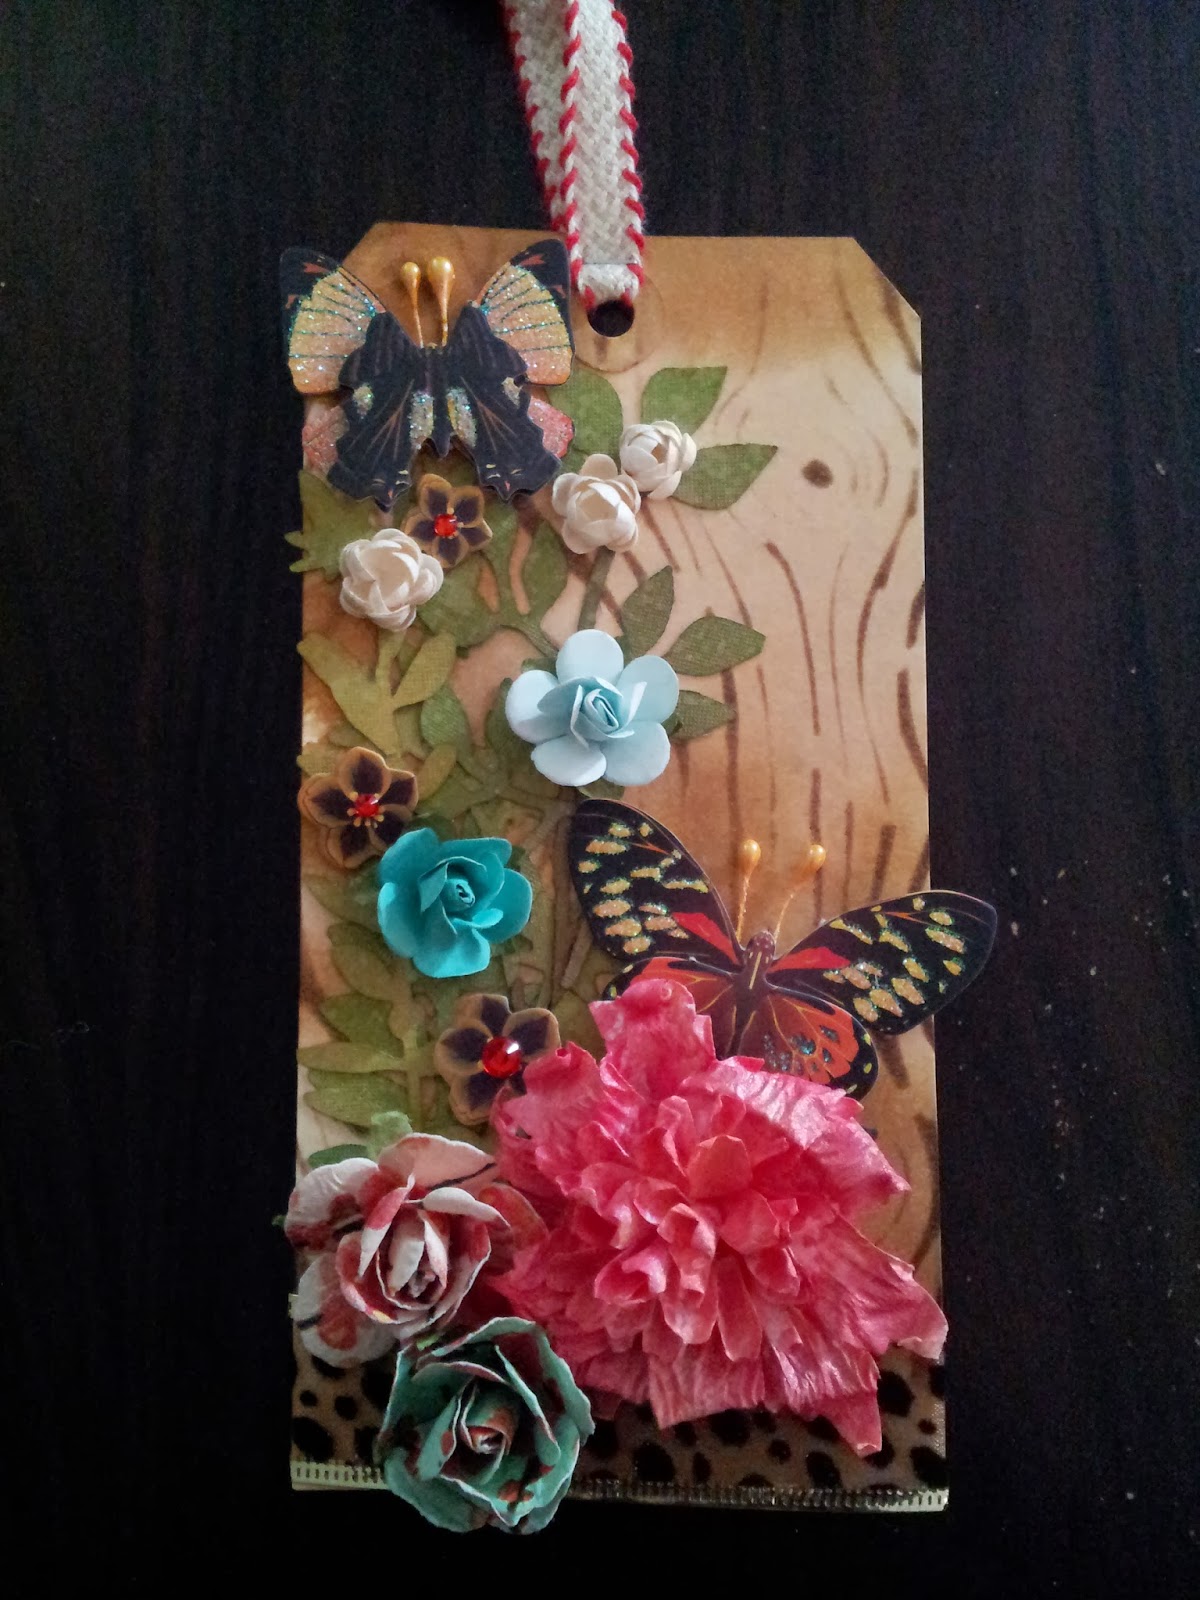
I used mostly Tim Holtz stuff for this tag... Sewing Room die, sewing edger, pumice stone distress stain, antique linen stain, frayed burlap, gathered twigs, brushed pewter, pine needles, evergreen bough, and aged mahogany, Crafter's workshop mini houndstooth stencil, distress ink antique linen, pumice stone, black soot, walnut stain, archival inks maroon, black, potting soil, Wendy Vecchi translucent embossing paste, liquid glass, bakers twine navy, tim holtz ribbon, twine, a grey fuzzy embroidery thread from my stash, Recollections rhinestones, stamp from TH Nature walk cling mounts, and a measure tape ribbon I had in my stash as well. 

First I stained a tag with antique linen and pumice stone and misted with water to blend them together.  While that was drying, I cut the sewing edger on some thin chipboard I had from some packaging left over.  One side was a glossy white and this is the side I used to color so that the color wouldn't soak into the paper but move around and pool on the surface while it dried.  :)  The scissor was colored using brushed pewter stain and pumice stone.  I blotted the silver on, dried, then added the pumice stone, dried and did another coat of pumice stone and dried.  This gave a really cool moddled effect.  I took archival ink black and edged the scissors with a small ink dauber to define them. 

Next, I stained the buttons.  The sewing spool was done the same way as the scissors, the red button is stained in aged mahogany and then inked around the edge with black soot ink.  The green button was first stained in pine needles, dry and then evergreen bough, dry.  ink around edges with black soot ink.  The sewing spool was stained with pumice stone first by streaking it to form a grain, dry, and then go back overtop with frayed burlap in by streaking it on too.  Dry.  The long tab part is done the same as the sewing spool.  Run pumice stone by streaking it on in a full line top to bottom.  Dry.  Then take frayed burlap and streak it in one full continuous stroke top to bottom and dry.  This forms the nice wood grain effect.  :)  Then wrap some bakers twine around the spool.  I fastened it to start with a mini staple and covered it when I wrapped the twine around.  I glued the last little piece in place to hold. 


Next I cut out the pieces from the sewing room Alterations die onto some greyish cardstock similar in color to pumice stone.  I used Pumice stone distress ink and with a blending tool inked the leg and the top knob.  I blended walnut stain around the bodice.  I then inked a fine edge with black soot around the whole piece.  Next, I took the translucent embossing paste and the houndstooth stencil and stenciled over the bodice part.  Dry.  I used a heat gun to speed up the drying because I was far to impatient to wait for it to air dry.  Once dry, I took black soot distress ink and inked the bodice.  The clear embossing paste acts as a resist so I could then take a damp paper towel and rub off the black from the clear emboss and it allows the underneath color to come thru. 


Because the cardstock had a texture to it, when I added the black distress ink it gives it a real fabric look.  So cool!  I took some fuzzy embroidery thread and wrapped it around the waist.  The button was made by coloring with aged mahogany stain, inking around the edge with black soot and then covering it completely with a glaze like glossy accent or liquid glass.  When dry it has a real glass like effect.  I tied some tinsel thread thru the holes and tied.  I then added some rhinestones along the neckline to mimic a necklace. 

 
 The spool at the top was colored with frayed burlap distress ink and edged with walnut stain.  Then I wrapped some twine around it and glued the tail on so it wouldn't unravel.  I attached it to the top corner.  I had some ribbon that looked like a tape measure but the color was too light an ivory so I antiqued it with stains, pumice stone, frayed burlap and antique linen and water.  When dry I glued it down the side.  Next, I stamped with archival black the Fig. stamp.  And then attached the mannequin using pop dots to add some dimension.  I finished it off with some TH ribbon on top with the mini attacher. 


I think this is one of my faves so far!  :)  Mostly because looking at it bring me happiness, it is the joy that my crafting brings me.  Thanks so much for stopping by and taking a peek at what I have been up to today.  :) 

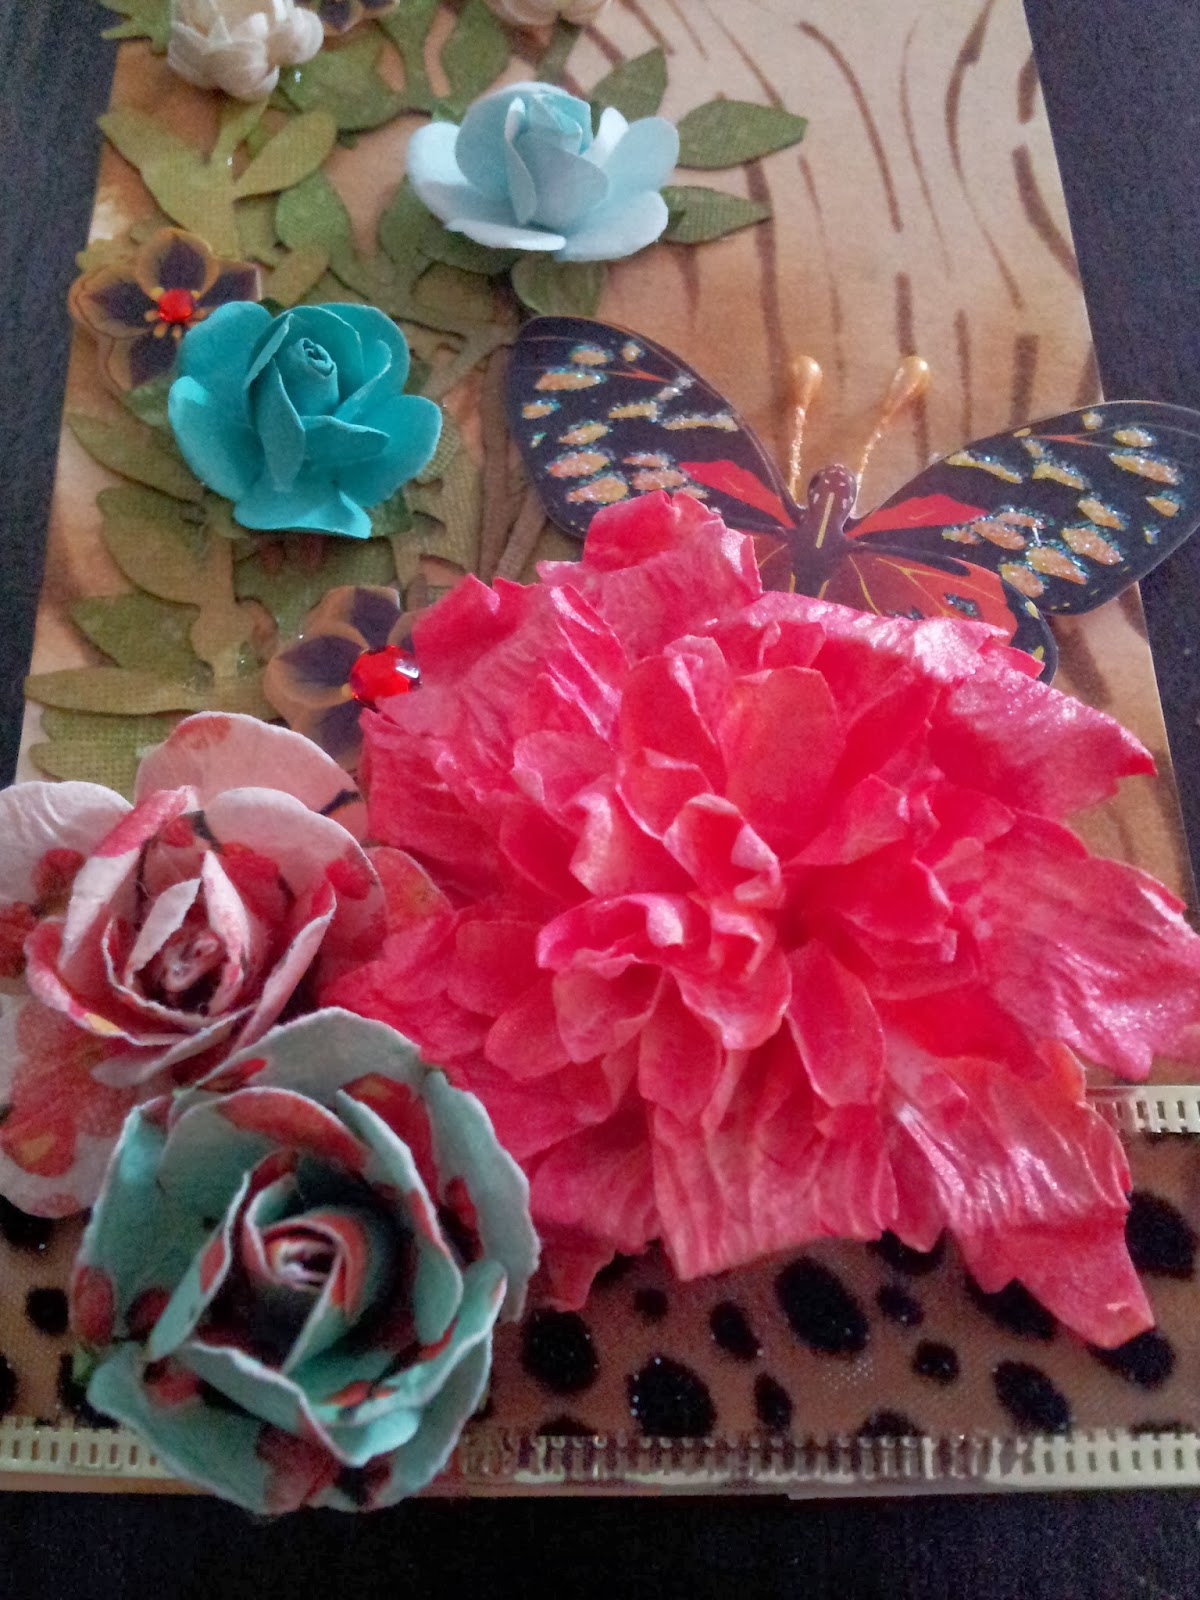
Here is a sneak peek of the jumbo tattered florals from TH that I worked on as well, and colored using Lyndi stamp gangs sprays!  They are awesome!  :)  I have no clue what I am going to do with the flower yet, but it'll be sitting there bringing me inspiration until I do.  :)

Tuesday, February 18, 2014

Springtime pleasures

Spring is on it's way, snow is melting away and temps are warming up little by little.  So what does that bring to your mind?  I think green, spring time blossoms, colors emerging.  So, these tags are inspired by the springtime feel I currently have. 

My first tag is done with a tag that I used left over stain from making a previous tag.  I stenciled a prima wood grain with walnut stain.   Then die cut using Alterations spring greenery from the Sizzlet die, and distress inked various colors...mowed grass, peeled paint, walnut stain, scattered straw and peacock feathers.  I had some sweet leopard print wired ribbon that I placed along the bottom.  I adhered the leaves and then applied a variety of different flowers and sizes and colors.  I then added some cute butterfly 3D stickers.  I finished off the tag with one of Tim's lace ribbons on top. 


The second tag is done with the Wendy Vecchi Archival reinker staining technique.  I used potting soil and orange blossom and gold mixative.  I cut out a Dienamics honeycomb and cut it up randomly and adhered it to the tag.  I made a fabric flower and splatter colored with Heidi Swapp sprays and added a CTMH metal flower embellishment.  I placed a pretty grey toned bling sticker as a flower stemmed base and then added my large flower and some small blossoms that started off as white and I tinted with Peach color Heidi Swapp spray.  I added some green Wendy Vecchi archival ink to the brown leaves I had and glued them in place.  I added some lace to the top and used my tiny attacher to hold it in place. 


 Thanks for stopping by.  Spring is in the air!  :) 

CTMH layout

Helllooooo....

This layout was one of the challenges that our hostess at the scrapbooking retreat gives each of us.  She gives us a package of various paper, a sample blueprint and some embellishments and we have to incorporate a CTMH stamp somewhere on the layout as well.  We can add extra to the page but we have to use the paper.  Everyone gets the same package and in the end we get to check out everyone's unique interpretations of the paper and the layout blueprint and a winner is chosen for a prize.  It's so much fun and has gotten me back into thinking about layouts because I have been doing mostly tags for over a year, and I was doing cards before that. 


This post is short and sweet.   The chipboard grass and the bling are not CTMH but all the rest of the page is.  Had fun working on this challenge.  I love CTMH paper, the colors are always so beautiful. 

Next up, I'll be showing you my tags that I've been working on... 

Great seeing you and don't forget to leave me a note letting me know that you were here.  :)   I'll post my tags as soon as I can so check back for more fun stuff.  :)  xoxo
 

A Reason, A Season or a Lifetime

This verse that is by an unknown author holds so much truth.  It is such a part of our lives that unless we are aware can sometimes bring as much heart ache as joy.  These next two pages are done round this verse.  I've had a lot of heart ache in my life coming from all types of relationships from partnerships to friendships.  I also had much happiness and joy from the same as well.  Sometimes differences or a situation would drive people apart and until I read this I seemed to always say... that's not fair.  Life sucks, these people suck...etc, BUT in reality, those people are in our lives for either a reason, a season or a lifetime.  It is up to us to figure out which one they fit into and move forward from there. 

So, here are my next couple of pages that tell that story. 

My first page, wasn't using paper from my MME pack.  It was Kaiser paper but I liked the pattern and the colors coordinated with the look I wanted in this album.  I used the weathered clock alterations die again.  I also used the inside piece on this one but in a different color cardstock and distressed both pieces in Vintage photo and Pumice stone.   Next, I cut out a piece of square cardstock and distressed with pumice stone.  I used my edger punch to give it a notepad look.  Love this edging punch!  I also used TH alterations dies layered wings, movers/shapers mini sewing room set, and ironwork gate.  I distressed the wings in scattered straw, brushed corduroy, and pumice stone.  The dressform is distressed in pumice stone and black soot.  The iron fence was cut out onto a light brown cardstock and distressed with pumice stone. 


The second page is the verse... A Reason, a Season or a Lifetime...

I didn't do much to this page because the story took up most of the page.  I added the title with Tim's letters stickers.  A few paper embellishments from Kaiser Crafts and some assorted flowers.  I distressed the edge of the paper with brushed corduroy, as well as the paper embellishments to tone down the white backgrounds. 


Thank you for taking some time to check out my progress and going on this journey with me.  :)  I still have several pages left of chipboard to do so this album is going to take me awhile to complete. 
 
I also did a normal layout page as part of a contest at the retreat that I will post at a later time and several tags that I've done too.  I can't believe I haven't gotten any of them posted.  I'm playing catch up now.  ;)   Lots coming up in the next week as long as hubby gives me the time to enter in my blogs I'll be good to go.  ;)  I'm almost back up to my full time hours so time is becoming sparse in the crafting department and then finding the time to post them, but I will do my best. 
 
Have a great day/night and I'll see you soon!  xoxo 


Monday, February 17, 2014

My journal album continued...

Oh my gosh... I'm so far behind.  I can't believe how far behind in my postings I have gotten.  Sorry, but I'm here.  :) On the upside, I'll have a number of different things to post over the next little while. :) 

Hubby is home and so I've been trying to sneak into my room while he's napping between my working and my online course I'm doing.  A bit of a challenge.  I went to a weekend scrapbook retreat a couple of weekends ago and I got some stuff done there, which is always a good time to actually get something accomplished with relatively minimal interruptions unless you stop what you're doing and go chit chatting with the ladies!  LOL  That does happens quite a bit at those retreats. 

So my next page in my chipboard album says, "I have reached a point in my life where I feel it is no longer necessary to try and impress anyone.  If they like me the way I am, GOOD, and if they don't, it is their loss."  It's kind of how I am feeling at this stage of my journey.  I need to be who I am and be happy with who I am.  I am imperfect and I am enough.  My whole life has been based around being a people pleaser and always doing what I thought everyone else expected of me, rather than just being me and pleasing myself every once in a while.  I know many women out there who are challenged in the same way.  This is part of my journey to becoming a better me for myself. 

So, this page continues working with MME paper Lost & Found.  I used Tim's alterations Eiffel tower die and cut it out on glittery glam black paper.  The little envelope is from Maya Road and I used distress ink vintage photo to distress is a bit.  The note is done on a CTMH Level 2 Journaling spot and also distressed with vintage photo. I added some pretty black lace to divide between the two papers I used, and added some awesome washi tape as well. 


The next page is about living the Here and Now.  I used a paper that had the Eiffel tower on it so it would correspond with the previous layout.  I used the Harlequin style stencil from Dylusions and softly stenciled with Pumice stone distress ink.  The camera in the top corner is a stamp from Deep Red.  The clock is Tim Holtz alterations die cut on the same glittery black paper from the previous page.  I adhered it to this stunningly beautiful burlap with lace overtop that I found at Michael's.  The lace was white and a little too white for the layout so I colored it with distress reinker in Fired brick and the water pen.  I took the same lace from the previous page and wrapped it around the clock.  I love this clock.  The pocket is from MME Lost & Found and the little mini tags are Recollections that I stamped sentiments on and tucked into the pocket. 


I  hope you enjoyed the next two pages.  I am so happy with this inspirational journal album.  It really has been an album of personal growth that ties in with many parts of the Brene' Brown course I am taking. 

Thanks for stopping in to see me!  I always appreciate the comments and love that you leave.  

Saturday, February 1, 2014

12 tags of 2014 February

I can't believe Valentine's is almost here.  Where has the start of this year gone already?  I was so excited to see Tim's February tag this month.  I had to get creative because I don't have any of his new stuff that he is using for this tag.  So what to use for the hearts?  I had a hearts embossing folder.  Ok, so I embossed and then took my embossing pad and lightly coated the raised surface with the powder and heat set it.  Not bad... doable.  I don't have the mini hearts die so I found some heart chipboard cut outs I had and used my liquid glass and distress glitter on that.  I also didn't have any of his new stamps or much of anything that seemed romantic or Valentine like.  The first sentiment I used was a frame with the word Love in it from one of his sets but it didn't take the chalk well and seemed muddled looking.  So, I rummaged and found the sentiment that I did use.  Now I have to say, this is the first time I have heat embossed anything with the new Craft heat tool.  I'm so used to the smoking hot heat gun that I had previously and so I was a little frustrated with the first go around because it definitely doesn't heat as fast or intensely as the other one.  Took a bit of getting used to.  I also didn't have any arrows!  Oh man.... so into my stash of embellishments and I came up with a key to use.  Key to my heart!  That sounds like Valentines.  Next, the metal industrial border, nope don't have that either.  But, I had an embossing strip that says 'with Love' and so I decided to take some paper with some foil taped to it and emboss that.  I then added some distress paint in black, let it dry a bit then rubbed it in to antique it a bit.  Also, didn't have his ribbons...off to my stash and find something that suited the card.  Phew.... that was a challenge.  If our local store gets any of this stuff in, I'll buy it and make another one using some or as much of it as I can. 

Here is my February tag: 


Onto finishing my laundry and completing my chores that I set aside again this afternoon to play.  Shrug.... yehhhh I'm a bad girl.  BUT...on the upside I did get a fair amount done this morning before  sitting down to do the tags.  :)  So I guess I'm not horribly bad.  LOL 
 
Thanks for stopping in to see me and my stuff.  :)  I look forward to seeing what other's do with this months tag if they don't have the stuff like me.  Enjoy the rest of your weekends!   :)
 

12 Tags of 2014 January

I had full intentions of doing the January tag and somehow the month got away on me and I didn't get it done in time to post it.  Shame on me...  I decided when I saw his February tag go up that I better get January done.  I loved his January tag.  I used the his January technique for the stop watch on my journal page called Moments, with a twist.  So with this tag I followed his technique again but instead of using the silver foil sheets, I found some Ranger copper sheets last week and I wanted to do a slightly varied look on Tim's.  I like the copper, and instead of using black distress paint I used Walnut stain staying in the same warm tones.  :) 

Here is my January 2014 tag:


Thanks for popping in.  I'm off to post my February one now.  :)